Emulating NotPetya bootloader with Miasm
NotPetya is a famous malware of the Petya family. It appeared in June 2017. The part running from the Master Boot Record (MBR) has been statically and dynamically studied, using for instance the Bochs debugger from IDA. Is another approach possible? This article’s goal is to show that we can emulate this bootloader using Miasm.
This article has been written by Jordan Bouyat (@la_F0uin3) and Adrien Guinet (@adriengnt). It has originally been published in the MISC magazine n°98 in French. This is a slightly updated and English translation of this article.
Introduction
This Petya variant first appeared in June 2017 in Ukraine. According to Mikko Hyppönen, Chief Research Officer at F-Secure, the infection vector would be the update mechanism of the accountability software M.E.Doc, widely deployed within Eastern countries.
This malware family has the particularity of overwriting the bootloader of the compromised machine in order to encrypt parts of the hard drive when it reboots. This article uses this bootloader as a pretext for a tutorial concerning the emulation and reverse engineering of these little beasts thanks to the Miasm framework. The associated code is available here: https://github.com/aguinet/miasm-bootloader/. It contains a Python implementation of a subset of the interfaces of a classic x86 PC BIOS. The code was written in a way that is easily reusable for other cases, or even to help the development / debugging of bootloaders in general.
Related works
Many articles have already studied the behaviour of the NotPetya MBR, as well as its various cryptographic implementations and mechanisms (and their faults). Here are some significant ones:
- MISC n°86 : “Pleased to meet you, my name is Petya !”, written by Damien Schaeffer in July 2016
- MISC n°93 : “Petya or Not Petya, that is the question”, written by “Teddy and Benjamin” in September 2017, with a very thorough static reverse engineering of the bootloader.
- Crowdstrike : Full Decryption of Systems Encrypted by Petya/NotPetya. Study of an implementation error within the Salsa20 algorithm embedded in the bootloader (more on that subject later in the article).
NotPetya
This section deals only in a very general way with the malware’s cycle of life. It allows us to highlight the part studied in this article.
Once NotPetya has run on the victim’s machine, it generates an AES encryption key that will be used to achieve the first encryption phase. This key is itself encrypted with an RSA public key.
The malware then checks that the system uses a classical partition scheme and, if it has admin rights, enters its own data on the first sectors of the disc (from 1 to 18, then 32 to 34), with its own MBR in the first sector. If the system uses UEFI (with a GPT partition scheme), the malware skips this step. The machine then is restarted and the NotPetya bootloader executed: a Salsa20 key and a nonce are generated. These secrets are used to encrypt the Master File Table (MFT) 1 of NTFS file system. This data structure contains the metadata needed to find the data associated with each file. This operation looks like a classical “chkdsk”. Once this operation is done, the machine restarts one last time and then displays the ransom message.
Miasm
Miasm is a reverse engineering framework developed in Python. It has many features, among which:
- open, modify and generate binaries in PE, ELF 32, 64 LE, BE.
- assemble/disassemble x86, ARM, MIPS, SH4, PPC and MSP430 code.
- lift instruction semantics into a custom intermediate representation.
- emulate this intermediate representation, with various JIT (Just-in-time) compilers to speed things up.
- simplify/modify this intermediate representation, to de-obfuscate code for instance.
Why emulate NotPetya with Miasm?

There are various ways to emulate a bootloader. A classical approach is to use QEMU (or any other virtualization/emulation solution) by writing the bootloader on a virtual hard disk, but it makes it difficult to instrument the bootloader code. Such a thing is however possible via IDA’s Bochs debugger. This approach was adopted by Teddy and Benjamin in MISC No. 93, but also by Saurabh Sharma 2. This method usually works well and makes debugging a bootloader an easy task.
In the article associated with the presentation of his Miasm tool at SSTIC in 2012 3, Fabrice Desclaux showed Miasm possibilities. One of the proposed applications was the emulation of a bootloader.
The ability to fully emulate a bootloader (until the BIOS interruption) with a framework like Miasm gives a sharper control over what’s happening, possibly allow de-obfuscation, and use all the tools developed in Miasm for this task. It becomes for example very simple to instrument the code in order to see the data read/written on the disk, the secrets generated, etc.
Eventually, NotPetya’s bootloader code is succinct, non-obfuscated and extremely simple (it runs in real mode, in 16 bits and calls only a few BIOS interruptions), so it is a nice case study to play with Miasm!
PC/x86 bootloader
Introduction
We will only discuss here the inner workings of “old-school” BIOS bootloaders. We will not talk about UEFI.
On x86 PCs, when the machine starts, the BIOS loads the first disk sector (named Master Boot Record, or MBR) at 0x7C00, and then jumps to this address. The MBR hence contains the bootloader code. At this moment, the processor only supports 16-bit instructions and can only address memory in real mode 4.
As a reminder, one disk sector contains 512 bytes. Therefore, it is not possible to store a lot of code on this sector only. That’s why bootloaders are usually designed in several stages. Indeed, the code in the first sector (the first stage) will load the stage 2 code from the hard drive , and then jump into it.
Below is the MBR’s structure written by NotPetya:

NotPetya case
NotPetya works exactly this way. The bootstrap code (in green in the figure above) is the assembly code below. The code at address 0x7C38 (that we named disk_read_stage2), writes data in sectors 2 to 34 (inclusive) in memory at 0x8000, and then jumps to this address:
seg000:7C00 cli
seg000:7C01 xor ax, ax
seg000:7C03 mov ds, ax
seg000:7C05 mov ss, ax
seg000:7C07 mov es, ax
seg000:7C09 lea sp, start
seg000:7C0D sti
seg000:7C0E mov eax, 32
seg000:7C14 mov byte ptr ds:word_7C93, dl
seg000:7C18 mov ebx, 1
seg000:7C1E mov cx, 8000h
seg000:7C21 call disk_read_stage2
seg000:7C24 dec eax
seg000:7C26 cmp eax, 0
seg000:7C2A jnz short loc_7C21
seg000:7C2C mov eax, dword ptr ds:8000h
seg000:7C30 jmp far ptr 0:8000h
Emulation with Miasm
Installation
The system used for these tests is Linux-based. Windows 10 users should be able to make it work by using Windows Subsystem for Linux (WSL), by installing for example Ubuntu using the Windows Store 5.
We recommend using the version of Miasm specified in the README file from the GitHub repository. At the time of writing lines, the version used is v0.1.1. To recover this specific version, do:
$ git clone --depth=1 --branch=v0.1.1 https://github.com/cea-sec/miasm/
We use the LLVM-based Miasm JIT engine, which needs the llvmlite python package. Other needed dependencies are installable directly through the provided requirements.txt file:
$ cd /path/to/src && pip install -r requirements.txt
Then just install Miasm:
$ cd /path/to/miasm && pip install -r requirements.txt && python ./setup.py install
Implementation
All the techniques described in this article can be tried thanks to the src/emulate_mbr.py script in the aforementioned GitHub repository.
Multiple options are provided, some of them could be used to win some time during your experiments:
--dry: simulates the success of disk writings, but actually writes nothing.--skip-encryption: the encryption function (which is the hottest one) will be ignored (actually transforming it into a function that does nothing).--verbose-bios-data: dumps log messages from our BIOS implementation, with a dump of read and written disk data.--verbose-bios: same as--verbose-bios-data, without the read and written disk data.
The --help flag can be used to have a more detailed list of available options.
The activation of Miasm’s logs can considerably slow down the performances of the overall script. The --log-miasm-newblocks option only dumps blocks that have never been “jitted” by Miasm.
Creation of a test disk
We performed our tests with virtual machines running Windows XP and Windows 10. The underlying hypervisor does not matter (VMWare, VirtualBox), as long as the disk created has a fixed size and is using VMDK. The emulation of the bootloader is done directly on the virtual machine’s disk. An advantage to this method is that there is no need to extract the bootloader from the original malware DLL or from the generated VMDK.
 Emulation scenario
The test scenario is the following:
- voluntary infection of the virtual machine with NotPetya
- wait for at least 10s (the machine shouldn’t reboot by itself, or the bootloader will actually launch its encryption code)
- shutdown the virtual machine: the MBR has been replaced
- run the emulation: the MFT is encrypted by the bootloader which then displays the ransom
If your virtual machine is not using a flat VMDK representation, you can convert it using QEMU:
$ qemu-img convert -f vmdk mydisk.vmdk -O raw mydisk.raw
We also give a test image in the aforementioned Git repository (file disk.raw.bz2). Once unzipped, it is a 1GB file, and contains a simple NTFS partition with some test files.
We can now emulate the NotPetya bootloader. In order to do this, we need to emulate a BIOS capable of:
- reading/writing disk sectors
- showing characters on the screen
- capturing key strokes
- booting on an MBR (“light” boot/reboot)
We are going to see how to implement this using Miasm.
System abstraction
We implement an abstraction of a simple system as seen by the BIOS. It contains:
- a virtual disk (the
HardDriveclass) - a video screen, which goes through a classical Unix terminal, using the
stdoutpipe - a keyboard, which uses the
stdinpipe to gather key strokes (functions inasync_kb.py)
Abstraction is implemented in the System class, of which one instance is used during the emulation. This instance is initialized alongside the Miasm VM.
Miasm virtual machine initialization
As explained in the introduction, the MBR code is loaded and executed by the BIOS at the address 0x7C00. Then, this code will load and write its second stage at the address 0x8000. The left space is dedicated to the stack. It begins at the address 0x500 and ends at the address 0x07C00. Therefore, the corresponding space is [0x00000500:0x00007BFF].
First, we need to declare these memory spaces to the Miasm virtual machine:
HD0 = HardDrive(hd_path)
sys_ = System([HD0])
mbr = HD0.read_sector(0)
stage1_addr = 0x07C00
stage2_addr = 0x08000
jitter.vm.add_memory_page(stage1_addr, PAGE_READ | PAGE_WRITE | PAGE_EXEC, mbr, "NotPetyaS1")
jitter.vm.add_memory_page(stage2_addr, PAGE_READ | PAGE_WRITE | PAGE_EXEC, "\x00"*SECTOR_LEN*32, "NotPetyaS2")
jitter.vm.add_memory_page(0x500, PAGE_READ | PAGE_WRITE, "\x00"*(0x7C00-0x500+1), "Stack")
# Pretty print of the memory layout
print(jitter.vm)
Now, the memory layout of the Miasm virtual machine is the following:
Addr               Size               Access Comment
0x500              0x7700             RW_    Stack
0x7C00             0x200              RWX    NotPetyaS1
0x8000             0x4000             RWX    NotPetyaS2
NotPetya loads 32 sectors from the disk to the memory when executing the first stage. This is why the allocated memory for the second stage is 32 sectors long (32*512 bytes).
BIOS interruption handling in Miasm
Miasm allows us to specify an interruption handler which will be called whenever an INT instruction is executed. To do so, we have to tell Miasm to call our BIOS interruption handler exception_int with the help of add_exception_handler of the current used jitter:
jitter.add_exception_handler(EXCEPT_INT_XX, lambda jitter: exception_int(jitter, sys_))
Interruption support
Now, we have to implement the different BIOS interruption handlers. We can split them into four main families :
INT 10h: access to the screen (write characters, change colors…),INT 13h: access to the disk (read/write sectors, get disk geometry…),INT 16h: access to the keyboard (read keystroke…),INT 19h: boot on the disk’s MBR.
INT 13h
Here is an example of the INT 13h interruption, with the 0x43 code function (Extended Read Sectors From Drive). This code implements the instruction to load multiple sectors from the disk to the memory:
@func(disk_interrupts, 0x42)
def extended_read_sectors(jitter, sys_):
    drive_idx = get_xl(jitter.cpu.DX)
    print "Extended read sectors, drive idx 0x%x" % drive_idx

    dap = jitter.vm.get_mem((jitter.cpu.DS << 4)+jitter.cpu.SI, 16)
    dap_size, _, num_sect, buff_addr, abs_sect = struct.unpack("<BBHIQ", dap)

    hd = sys_.hd(drive_idx)

    print("  Read %d sectors from sector %d" % (num_sect, abs_sect))
    size = num_sect * SECTOR_LEN
    data = hd.read(abs_sect * SECTOR_LEN, size)

    jitter.cpu.cf = 0 # No error
    # AL is the number of sectors read
    # AH is the return code, 0 = successful completion
    jitter.cpu.AX = set_16bit_reg(low=int(len(data) / SECTOR_LEN), high=0)
    jitter.vm.set_mem(buff_addr, data)
Note: this Python code doesn’t include error management for readability reasons. The sys_ object is the system abstraction explained in System abstraction.
Sectors can be loaded from disk in two different ways by using a different kind of addressing mechanism for the same INT 13h interruption:
CHS (Cylinder, Head, Sector) addressing mechanism, used by the
02h/03hcodes. It can read/write one or many sectors by specifying the index of the cylinder and the head,LBA (Logical Bloc Addressing) addressing mechanism, used by the
42h/43hcodes. It can read/write one or several sectors by specifying the corresponding sector in a absolute way, i.e. by specifying the offset from the first sector number on the disk regardless of heads/cylinders.
NotPetya uses the LBA addressing mechanism. This method needs to fill a DAP (Disk Address Packet) structure. This structure describes which sectors to read/write and where to read/write them into live memory.
One can see that an extended LBA structure exists to read or write multiple sectors at the same time:
| 0 | 1 | Packet size |
| 1 | 1 | Zeroed field |
| 2 | 2 | Number of sectors to load |
| 4 | 4 | Buffer address to load sectors to (seg:off) |
| 8 | 8 | Absolute offset of the first sector to read |
To sum up:
- the DAP is parsed,
- data is read from the virtual disk,
- the read data is stored in the corresponding memory page of the instantiated Miasm virtual machine.
The writing mechanism is the exact opposite: the specified buffer address in the DAP contains the data to write.
INT 19h
The second chosen example is the INT 19h interruption (diskboot). It reboots the machine 67 and is used in two locations :
- at address
0x892E, which is called if a fatal error occurs, - at address
0x820D, when the machine reboots after the MFT encryption.
The INT 19h interruption is called right after the POST (Power On Self Test) procedure by the BIOS. After that, the MBR code is loaded into live memory at Ox7C00. Then, the BIOS jumps at this address.
So we can say here that it is used as a sort of soft reboot because the reboot is not a complete one. This instruction is part of the boot process after BIOS execution. Some BIOS can handle boot medium priority while others just loop over available mediums and boot on the first one it can.
Here, we will emulate this instruction simply by loading again the MBR code into the memory page dedicated to it (stage 1), and then jump onto it (at address 0x7C00):
diskboot_interrupts = FuncTable("INT 19h (diskboot)")
@func(diskboot_interrupts, 0x02)
def reboot(jitter, sys_):
    # Here, we assume only one bootable disk (index 0)
    hd = sys_.hd(0)
    mbr = hd.read_sector(0)
    jitter.vm.set_mem(0x7C00, mbr)
    jitter.pc = 0x7C00
For a few more hacks…
The STI (Set Interrupt Flag) instruction is used at address 0x7C0D. It can activate masked interruptions (flag IF and offset 9 of the FLAGS register). This flag doesn’t have any effect on non-maskable interruptions. Because hardware interruptions are fully emulated, Miasm doesn’t contain (legitimately) semantics for this instruction.
So we simply decided to ignore it by setting a breakpoint at its corresponding address:
jitter.add_breakpoint(0x7C0D, handle_sti)
Then, we redirect the execution flow to the next instruction. Because this instruction is only 1 byte long, a simple incrementation of the program counter does the trick:
def handle_sti(jitter):
    jitter.pc += 1
    return True
Yippie kay yay motherfucker !
Now that the useful handlers are implemented and the MBR code is loaded and mapped in Miasm virtual machine, emulation of NotPetya can begin:
jitter.init_run(stage1_addr)
jitter.continue_run()
If the --verbose-bios-data flag is set (see Implementation), output of the script prints the content of the various read and write operations on the disk. For example, here is the content of the second sector (of the 32 loaded sectors by the bootloader at 0x8000):
Extended read sectors, drive idx 0x0
  Read 1 sectors from sector 2
00000000: 50 FF 76 04 E8 91 0A 83  C4 0A E8 3B 07 CD 19 5E  P.v........;...^
00000010: C9 C3 6A 0E E8 39 07 5B  68 70 9C E8 C0 03 5B C3  ..j..9.[hp....[.
00000020: C8 04 04 00 56 6A 00 6A  01 6A 00 6A 20 8D 86 FC  ....Vj.j.j.j ...
00000030: FD 50 8A 46 06 50 E8 21  0A 83 C4 0C 6A 00 68 8E  .P.F.P.!....j.h.
[...]
The loaded code matchs stage 2. Also, one can easily see the content loaded from sector 32:
Extended read sectors, drive idx 0x80
  Read 1 sectors from sector 32
00000000: 00 AA 92 E7 82 11 15 D3  20 96 A7 75 51 C0 36 08  ........ ..uQ.6.
00000010: E8 65 42 8C 73 9F 06 53  77 CB C5 95 60 C8 38 69  .eB.s..Sw...`.8i
00000020: 9B 0D A4 99 E0 13 12 30  79 31 4D 7A 37 31 35 33  .......0y1Mz7153
00000030: 48 4D 75 78 58 54 75 52  32 52 31 74 37 38 6D 47  HMuxXTuR2R1t78mG
00000040: 53 64 7A 61 41 74 4E 62  42 57 58 00 00 00 00 00  SdzaAtNbBWX.....
00000050: 00 00 00 00 00 00 00 00  00 00 00 00 00 00 00 00  ................
00000060: 00 00 00 00 00 00 00 00  00 00 00 00 00 00 00 00  ................
00000070: 00 00 00 00 00 00 00 00  00 00 00 00 00 00 00 00  ................
00000080: 00 00 00 00 00 00 00 00  00 00 00 00 00 00 00 00  ................
00000090: 00 00 00 00 00 00 00 00  00 00 00 00 00 00 00 00  ................
000000A0: 00 00 00 00 00 00 00 00  00 48 34 79 5A 73 77 56  .........H4yZswV
000000B0: 54 64 43 6B 43 77 55 68  72 31 4D 52 6D 4A 65 69  TdCkCwUhr1MRmJei
000000C0: 76 31 34 46 4B 39 6A 5A  6A 4D 36 36 4C 44 79 65  v14FK9jZjM66LDye
000000D0: 71 52 4C 64 6B 38 53 58  53 53 73 53 53 45 78 34  qRLdk8SXSSsSSEx4
000000E0: 44 51 57 4E 47 00 00 00  00 00 00 00 00 00 00 00  DQWNG...........
000000F0: 00 00 00 00 00 00 00 00  00 00 00 00 00 00 00 00  ................
[...]
000001F0: 00 00 00 00 00 00 00 00  00 00 00 00 00 00 00 00  ...............
This sector is where NotPetya stores data. According to the description done in MISC 805 n°93, we can deduct its content :
0x00is the encrypted disk flag,AA 92 E7 82 11 15 D3 20 96 A7 75 51 C0 36 08 E8 65 42 8C 73 9F 06 53 77 CB C5 95 60 C8 38 69is the 32 bytes long Salsa20 key,0D A4 99 E0 13 12 30 79is a 8 bytes long nonce,- next data is the random string printed when the malware was executed on Windows at the beginning.
After the encryption is done by the bootloader, key and nonce are erased from disk with 32 successive writings of zeros.
Moreover, we can see that sector 35 is used to store the number of total encrypted MFT entries. For example, here is the content of sector 35 right after the MFT header encryption:
Extended write sectors, drive idx 0x80
  Write 1 sectors at offset 35 (from memory at 0x5C74)
00000000: 01 00 00 00 00 00 00 00  00 00 00 00 00 00 00 00  ................
[...]
Retrieving secrets in memory
One of the advantages of emulation is the ability to easily analyze memory pages. In our case, it is possible to retrieve the Salsa20 key used, even after the MFT table has been encrypted (during the “false chkdsk”, see NotPetya).
In fact, as explained in section INT 19h; after the encryption is over, the bootloader executes a “soft reboot” with the help of the interruption INT 19h. It doesn’t reboot completely the computer therefore the BIOS is not executed again. The data present in memory before the “soft reboot” is not tampered with. If the computer goes through hard reboot or reset, there would be great chances for the BIOS to overwrite data present on the stack with its own, including the precious Salsa20 key.
So, if the computer has not been rebooted or reset, it is pretty interesting to see if the Salsa20 key is still in memory. To do so, we simply read the key written in sector 32 (see this section) and store its value. Then, we place a breakpoint on the instructions in charge to show the ransom message, at address 0x85AF:
key = HD0.read(32*SECTOR_LEN + 1, 32)
jitter.add_breakpoint(0x85AF, functools.partial(find_key_in_mem, key=key))
The find_key_in_mem function browses the virtual machine memory to find the key stored in the previous step:
def find_key_in_mem(jitter, key):
    # Find if the salsa20 key is still in memory!
    mem = jitter.vm.get_all_memory()
      print >>sys.stderr, "\n[+] Looking for key %s in memory..." % key.encode("hex")
    for addr,v in mem.iteritems():
        idx = v['data'].find(key)
        if idx == -1:
            continue
        print >>sys.stderr, "[+] Key found at address %s!" % hex(addr + idx)
        break
    else:
        print >>sys.stderr, "[-] Key not found in memory!"
    return True
This operation can be activated in the script using --hook=find_key option, like this:
$ python ./emulate-mbr.py --hook=find_key disk.raw

Repairing file system on C:
[... encryption happends here ...]

[+] Looking for key [your salsa20 key] in memory...
[+] Key found at address 0x674a!
To speed up the process, the --skip-encryption option can be used (see Implementation). Be careful, even if this option is used, the encryption flag in sector 32 is still set. The flag --dry prevents this behaviour.
Because we know the address where the key is stored (0x674A), we can put a breakpoint on a write access at this location, allowing us to know which part of the bootloader writes this key:
def print_ip(jitter):
    print(hex(jitter.pc))
    return False

jitter.exceptions_handler.callbacks[EXCEPT_BREAKPOINT_MEMORY] = []
jitter.add_exception_handler(EXCEPT_BREAKPOINT_MEMORY, print_ip)
jitter.vm.add_memory_breakpoint(0x674a, 1, PAGE_WRITE)
Because there is no ASLR or equivalent mechanism, this address will always be the same!
Bootloader modification to decrypt the MFT
If we have a mechanism to write directly into the memory of the machine (for example by using a PCI Express card 8, or other interfaces like FireWire or Thunderbolt 9), it is possible to decrypt the MFT data. The attack consists in patching the bootloader memory so that its uses the remaining key on the stack. This section simulates this attack using Miasm.
To do so, we will inject some code at address 0x82A8. This function checks that the key entered is the expected one. Given that it has been erased from the hard drive, and that the ransom text is completely random 10, the bootloader has in theory no way to know if the entered key is the right one. This function will always return 0 (incorrect key). The injected code will copy the key Salsa20 from the 0x674A address to a specific location on the stack, so that the decryption function at 0x835A will use this key. We will then jump on this function.
Associated assembly code is the following:
    ; Save registers on the stack
    PUSHA
    LEA DI, WORD PTR [BP-0x44]
    LEA BX, WORD PTR [key_addr]
    XOR CX,CX

    ; Copy the key that remains on the stack to [bp-0x44]
loop:
    MOV EAX, DWORD PTR [BX]
    MOV DWORD PTR [DI], EAX
    ADD DI, 4
    ADD BX, 4
    INC CX
    CMP CX,8
    JNZ loop

    ; Restore previously saved registers
    POPA
    ; Jump on the decryption function (CS:OFFSET => using an absolute address)
    JMP 0000:0x835A
We use Miasm to assemble it using the following function:
def asm_shellcode(asm, labels = None):
    machine = Machine("x86_16")
    symbol_pool = asmblock.AsmSymbolPool()

    # Assemble
    blocks, symbol_pool = parse_asm.parse_txt(machine.mn, 16, asm, symbol_pool)

    # Set custom labels
    if not labels is None:
        for name,value in labels.iteritems():
            sym = symbol_pool.getby_name(name)
            symbol_pool.set_offset(sym, value)

    # Resolve all the labels
    patches = asmblock.asm_resolve_final(machine.mn,
                                         blocks,
                                         symbol_pool)

    # Patch the final code with the label values
    shellcode = StrPatchwork()
    for offset, raw in patches.items():
        shellcode[offset] = raw
    return str(shellcode)
Let’s take a look at this function. The code is first assembled using an x86 16-bit assembler. Given labels are then associated to concrete values using the symbol_pool.set_offset function. Remaining labels (in our case loop) are resolved with the asmblock.asm_resolve_final function, which returns assembly code for each block. We finally use the StrPatchwork function to assemble the final “shellcode”.
The read_key_and_patch function loads the key in memory, dumps it and writes the freshly assembled code in memory:
def read_key_and_patch(jitter):
    # Key is still in the stack, at 0x674A. You can find this value by activating the
    # find_key_in_mem breakpoint!
    key_addr = 0x674A
    key = jitter.vm.get_mem(key_addr, 32)
    print >>sys.stderr, "\n[+] Key from memory: %s" % key.encode("hex")

    # Assemble our "shellcode" thanks to Miasm!
    shellcode = """
...
    """
    shellcode = asm_shellcode(shellcode, {"key_addr": key_addr})

    # Patch the bootloader in memory to decrypt using the key
    jitter.vm.set_mem(0x82A8, shellcode)
    return True
The remaining thing to do is to put a breakpoint at the same address as in section Retrieving secrets in memory (0x85AF) to call this function:
jitter.add_breakpoint(0x85AF, read_key_and_patch)
Everything is now set up. When the bootloader asks for the decryption key, user will just have to press enter. --hook=patch_bootloader flag of the emulate_mbr script performs this attack.
It is worth mentioning that we actually tried this at Synacktiv’s headquarters using vulnerabilities in HP’s iLO4 to gather the Salsa20 key from memory, patch the bootloader and decrypt MFT data.
Encryption keystream study
The encryption algorithm used is Salsa20 stream cipher. The general principle is: a random data flow based on a key - commonly called the keystream - is generated, and this stream is XORed with the data which will be encrypted. An advantage of stream ciphers is that the data to be encrypted do not need to be padded. On the other hand, one needs to be careful not to use the same parts of this stream twice.
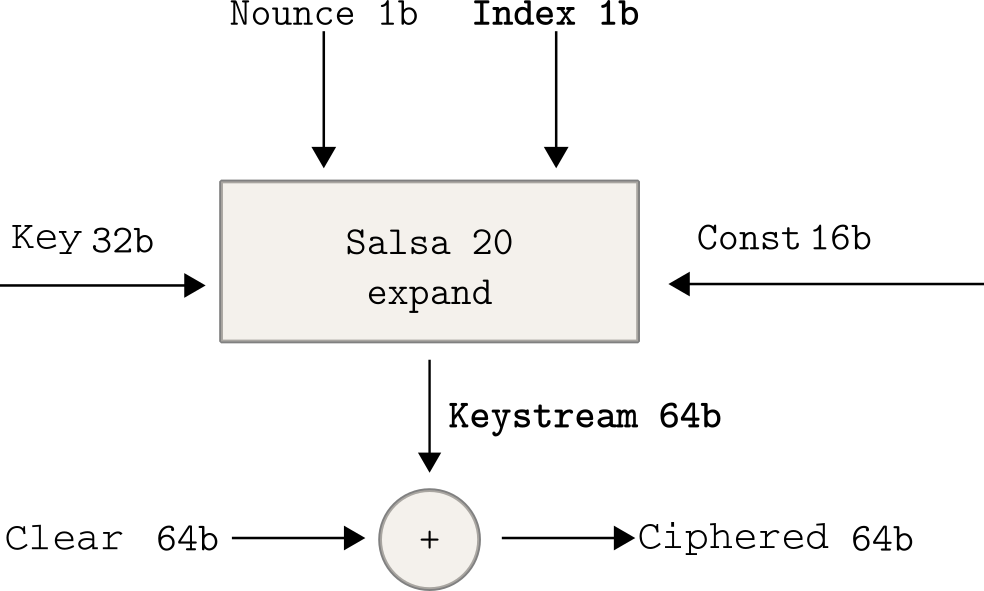 Data encryption with Salsa20
We can verify this using Miasm, by looking at the data before and after encryption, and by showing their XOR difference.
In order to do this, we already know how to put breakpoints. The beginning of the encryption function is at address 0x9798, and the end at address 0x9877. We are going to out the first breakpoint just after ‘enter instruction, and the second just before leave` statement, in order to have the stack properly aligned to recover data before and after encryption. The associated code is the following:
_last_buf = None
def encrypt_start(jitter, options):
    global _last_buf
    buf_ptr  = upck16(jitter.vm.get_mem((jitter.cpu.SS << 4) + jitter.cpu.BP + 0xC, 2))
    buf_size = upck16(jitter.vm.get_mem((jitter.cpu.SS << 4) + jitter.cpu.BP + 0xE, 2))
    _last_buf = jitter.vm.get_mem((jitter.cpu.DS << 4) + buf_ptr, buf_size)
    return True

def encrypt_end(jitter, options):
    global _last_buf
    buf_ptr  = upck16(jitter.vm.get_mem((jitter.cpu.SS << 4) + jitter.cpu.BP + 0xC, 2))
    buf_size = upck16(jitter.vm.get_mem((jitter.cpu.SS << 4) + jitter.cpu.BP + 0xE, 2))
    encr_buf = jitter.vm.get_mem((jitter.cpu.DS << 4) + buf_ptr, buf_size)
    keystream = ''.join(chr(ord(a)^ord(b)) for a,b in zip(_last_buf,encr_buf)).encode("hex")
    keystream = ' '.join(keystream[i:i+4] for i in xrange(0,len(keystream),4))
    print >>sys.stderr, "Keystream for next 2 sectors: %s" % keystream
    return True

jitter.add_breakpoint(0x979C, functools.partial(encrypt_start, options=options))
jitter.add_breakpoint(0x9876, functools.partial(encrypt_end, options=options))
The --dump-keystream flag of the emulate_mbr script enables this.
By looking at the output, we can see that between two sectors (2*512 bytes), the keystream is only shifted by two bytes, instead of the normally required 2*512 bytes. This shift is schematized in the image below:

We can also see that on a screenshot of the output of the emulate_mbr script below:
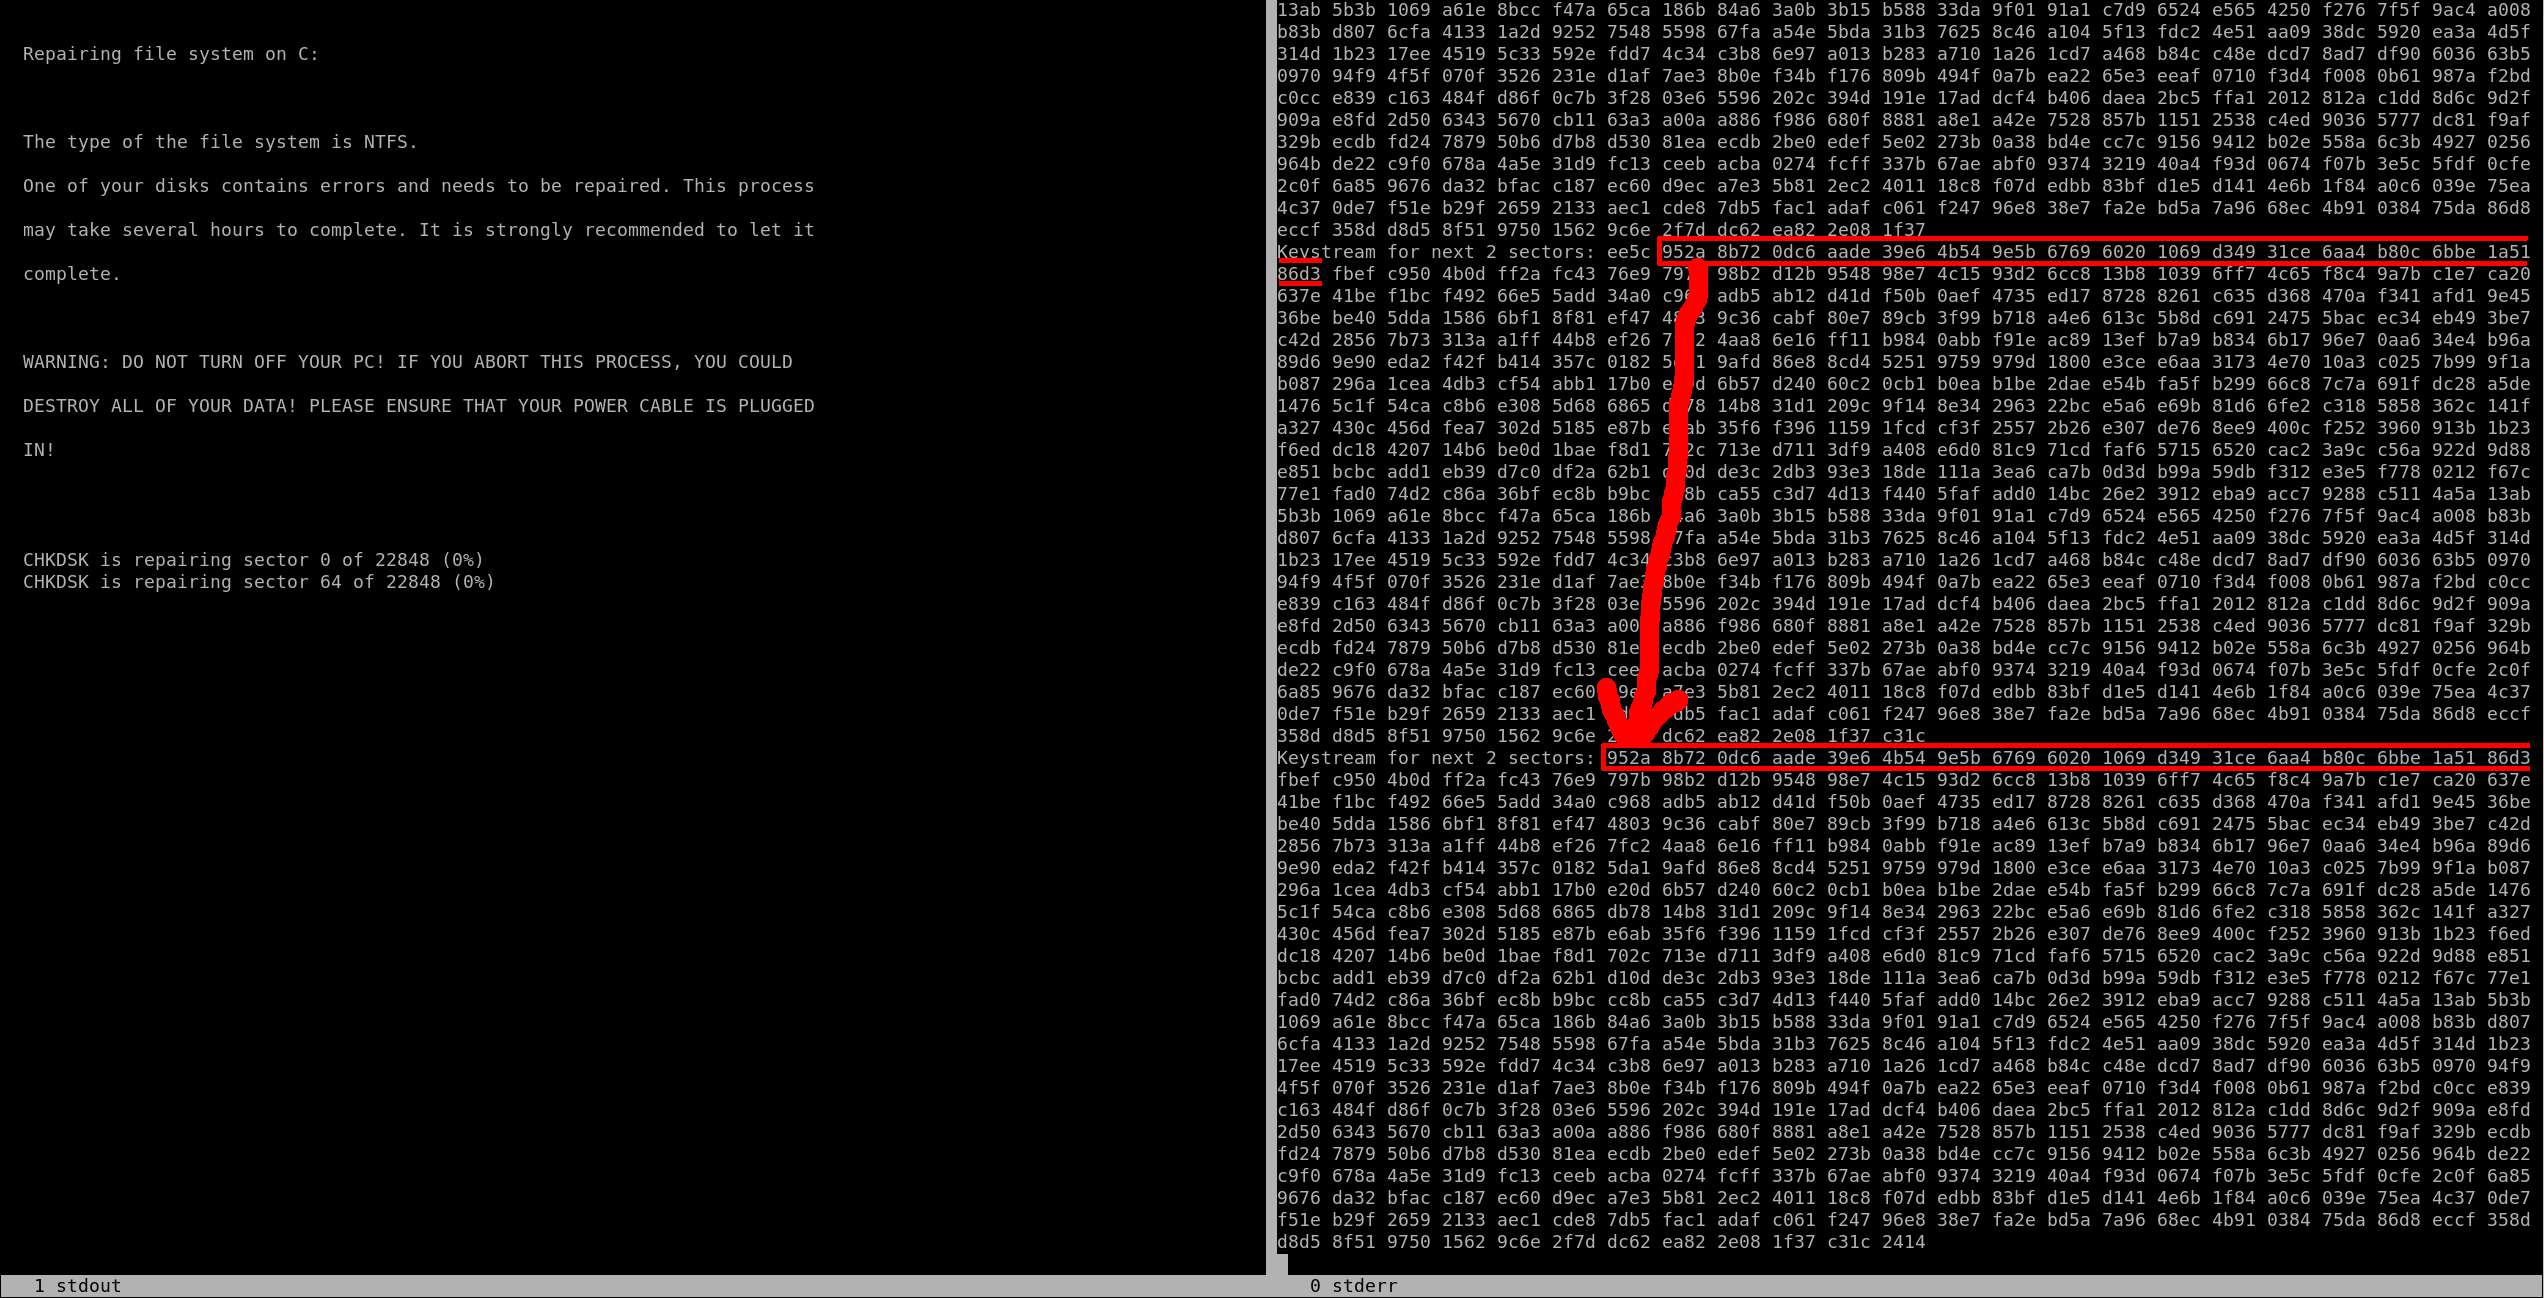 Screenshot of the keystream
Thus, parts of the keystream are reused between sectors, which may help to recover some of its original data.
Indeed, if we consider p to be the clear text, k the keystream and c the encrypted text, then the encryption function E is defined as E (p) = p xor k = c. A part of the MFT structures being invariant and known, it is therefore possible, in two sectors, to find part of the keystream used for these two sectors. This one is reused for the two following sectors by being simply shifted by two bytes, so some of the clear text from these other areas can be found.
This vulnerability in the Salsa20 implementation of the bootloader has been exploited by CrowdStrike to recover a large portion of MFT’s original data (between 98.10% and 99.97% depending on the method).
Conclusion
Emulation of the NotPetya bootloader code allows the verification of various assumptions and the understanding, in a very tangible way, of the different steps related to the encryption of MFT entries. In addition, it allows to easily find the bias in the Salsa20 keystream implementation (without having to statically reverse the algorithm), or to simulate the recovery of the key, which remains in memory after the encryption.
This article only shows a small subset of Miasm’s possibilities, and we hope that the approach adopted in this article will encourage uninitiated readers to try and play with it :).
Acknowledgments
We would like to thank gapz for his initial encouragement. Big thanks also to Camille Mougey and Fabrice Desclaux for their help and thorough reviews of this article! Thanks to Thomas Chauchefoin and zerk for their comments, and to Yseult for her help with the English translation.
Appendix: application using vulnerabilities in HP iLO 4
With Alexandre Gazet & Fabien Perigaud, we spent some time in Synacktiv’s offices to combine the attacks described in this article with vulnerabilities they found with Joffrey Czarny on HP iLO 4’s management engine. These vulnerabilities allowed us to read and write the memory of an infected server stuck at NotPetya’s bootloader stage, so that we were able to recover the encryption key and patch the bootloader in order to decrypt the MFT.
A full write up of the experiment can be read on Airbus seclab website.
https://shasaurabh.blogspot.fr/2017/07/debugging-mbr-ida-pro-and-bochs-emulator.html ↩
https://www.sstic.org/2012/presentation/miasm_framework_de_reverse_engineering/ ↩
https://docs.microsoft.com/en-us/windows/wsl/install-win10 ↩
https://www.sstic.org/media/SSTIC2011/SSTIC-actes/attaques_dma_peer-to-peer_et_contremesures/SSTIC2011-Article-attaques_dma_peer-to-peer_et_contremesures-lone-sang_duflot_nicomette_deswarte.pdf ↩
https://www.crowdstrike.com/blog/petrwrap-ransomware-technical-analysis-triple-threat-file-encryption-mft-encryption-credential-theft/ ↩